
December 28, 2010
My Guess - Shania Bag
Well well well.... here we are on the brink of a new year and all I can think about are handbags. I got this Guess - Shania handbag a few months ago and still have not taken it out of my closet! I love all my Guess handbags and although I do love this one, it's not what I would grab at first thought. I like my bags like I like a lot of things in my life... BIG, BRIGHT, and SHINY. I do love this bag and upon googling it to see if I got a good price on it I realized that I got a smoking deal on it!

December 23, 2010
Happy 60th Birthday Momma!
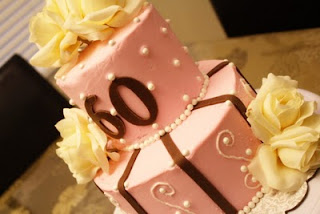
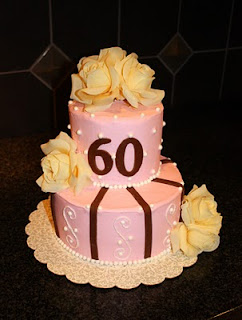
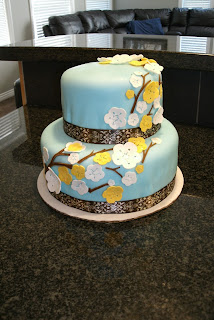
It's my mom's 60th birthday today. Most people would agree that it's quite a milestone, and so I wanted to make her a cake that was elegant, classy, and feminine.
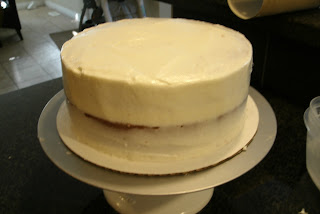
At first I didn't want to make "another" pink cake. But white just didn't bring the pearls out. And I don't like yellow for some reason on cakes. Anyways, after dropping the top tier onto the bottom one and yelling an expletive word in front of my kids, I managed to fix it up as good as I could. Oh BTW, I really hate those frosting sheets by cricut. Useless in my opinion. Could not cut one good image on them so instead I had to hand pipe everything!
Inside is mango icing with golden cake and pureed mango. Outside is pink buttercream with sugar pearls and chocolate fondant accents. I love you momma! Happy 60th!


The Ruffle (Corkscrew) Scarf
So I rarely knit scarves. Rarely! that's because a lot of times I get bored before I finish so I just don't do them. Sometimes they are just too much of a mindless knit for me. But then I saw this wonderful pattern for a ruffle scarf and decided to make one.
Turned out great! I definitely would try a lace pattern next time with some YOs to give it a bit more texture. Overall I'm pretty happy with it. Took longer than I thought, but don't all knitting projects do?


Turned out great! I definitely would try a lace pattern next time with some YOs to give it a bit more texture. Overall I'm pretty happy with it. Took longer than I thought, but don't all knitting projects do?


October 25, 2010
The Createry Shop on Etsy
Hello all you creative people out there!
I have started posting some of my knitted items on etsy. Please take a look and I hope you like what you see!
http://www.etsy.com/shop/createry

I have started posting some of my knitted items on etsy. Please take a look and I hope you like what you see!
http://www.etsy.com/shop/createry

October 17, 2010
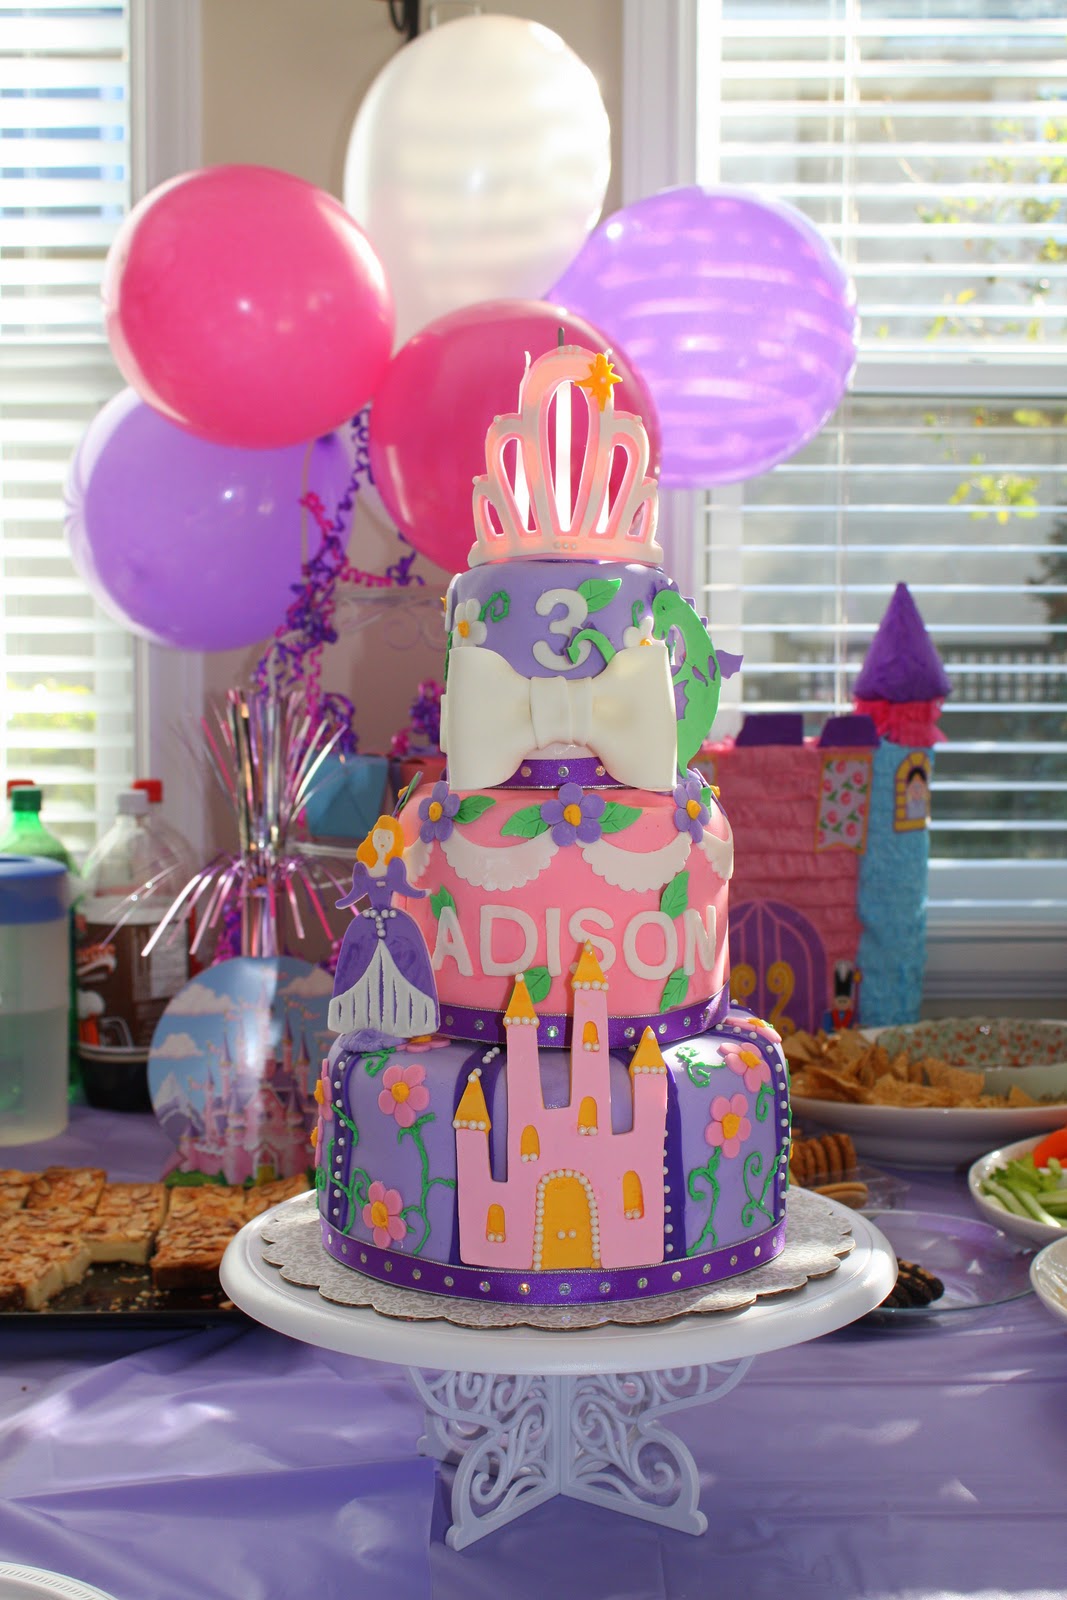
Princess Cake 2 with Princess, Castle, Dragon, and Tiara (Cricut Cake)
Here it is! The cake of my daughter's dreams. It took a night of baking and icing, and pretty much a whole day of decorating. Well, the truth is that I wasted a good 3 hours fooling around with fondant. i had tinted the fondant 2 days earlier and then it started crumbling and was very dry. Then I added too much water and it was a horrible mess. Then I screwed up again on the sides folding and creasing and so it took way longer than expected (and was much more frustrating!). I still don't know how people get the base fondant so smooth with no creases? I tried rolling it out bigger, tried thicker, thinner.... oh well. The cake turned out well and I am happy with it. That's all that matters!


October 13, 2010
Adison's 3rd birthday cake (1 of 2) with cricut cake
This is the cake I made for my daughter's 3rd birthday, for her actual birth day. Then a second one for the actual party day. Yes, yes, I know. I'm spoiling her by making 2 cakes for her. Oh well...
The cake is a white/pink marble cake, and the top layer is chocolate and the bottom is whipped cream icing. The rest is all fondant (except the tiara and the black ribbons!). I used the cricut cake for the lettering. I'm happy with how it turned out.... except!.... I need to practice on not getting fondant folds and creases on the side, and how to properly pipe icing. Otherwise, this was a good test run for my next cake for her on the actual party day.

The cake is a white/pink marble cake, and the top layer is chocolate and the bottom is whipped cream icing. The rest is all fondant (except the tiara and the black ribbons!). I used the cricut cake for the lettering. I'm happy with how it turned out.... except!.... I need to practice on not getting fondant folds and creases on the side, and how to properly pipe icing. Otherwise, this was a good test run for my next cake for her on the actual party day.

 |
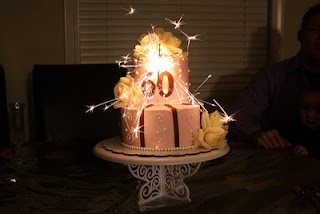
| The cake is on fire! No, not really... but it was cool to see that sparkler fly! |
October 2, 2010
Cherry Blossom Cake - Blue Fondant Base w/ White and Yellow Flowers (cricut cake)
Ok, this is the cake i just finished today. Not bad, but I don't know how to get the fondant not to crease on the sides. Any suggestions out there?
The cake is my mom's recipe for pound cake. A 6 inch on top and 9 inch on bottom, 4 inch in height for both so I torted 2 cakes together (see... I'm learning the lingo). I used whipped cream instead of icing because I found the icing to be sooooo sweet and sugary! OMG, I'm going to become a diabetic if I keep making and eating cakes. Ok, let's just make them and give them away!
BTW, whipped cream is a b*tch to deal with. It squeezes out when you roll the fondant on. Anyways, going to try something else next time. The cricut cake works well with gumpaste, I have had good and bad moments with using fondant though...
The thing with the Cricut Cake. It's not easy to use, I mean I cut the decorations out of gum paste but the branches are out of brown fondant. Really tough, either too gooey or too brittle.
Anyways, the word I'm looking for is TADA!


Banana Bread Cake with Cream Cheese Icing - Chocolate Fondant (My real 1st attempt and decorating a cake)
Ok, I bought the Cricut Cake machine.... and went through hell with it and back! I don't want to re-live the horrible experience I had with Michaels, so I won't write it down. Moving On....
This cake is a Banana bread cake made from scratch with cream cheese icing, chocolate fondant on outside.

This cake is a Banana bread cake made from scratch with cream cheese icing, chocolate fondant on outside.

2nd Birthday
Too bad I didn't get a clear shot of it. I was too busy with entertaining kids, I got a sore throat the next day. But it was a 2-tiered, safari-theme cake. Marble cake with cream cheese icing. BTW, that was the same flavour as the 1st birthday cake.


1st birthday cake
This one I had done for my daughter's first birthday. It was the one that started it all...


LET THEM EAT CAKE!!! CAKE CAKE CAKE CAKE CAKE!!!
Ahhh, cake. Even the word is beautiful to say. Cuh-ache!
So my obsession has been with cakes lately. Baking them, icing them, decorating them, etc. etc. Oh man! There is a lot I don't know about cakes! Every year for my birthday, or my daughters birthdays, I must insist on ordering a special custom made cake. It started with My 1st daughter's 1st birthday. That's when I got introduced to something called FAWN-DAWNT (aka Fondant). That one cake cost $69 and I thought I had lost my mind paying that much for a cake. Then her 2nd birthday came and that one cost $226. OMG, I was ready this 3rd time to spend $250 until my husband said the magic words,"Why don't you make it yourself?". That started my endless nights of googling, youtubing, reading, and watching cakes. It's really hard to get a pro-looking cake!
But the flood gates are opened. Ala Supernatural, a seal has been broken. Now you can follow me and my journey through cakes. So far it's been rewarding, but frustrating and time consuming learning the basics. I have put my cards, my papers and punches, my knitting needles, my sewing machine and serger aside for now. I am now elbow deep in fondant, gum paste, icing, and cake recipes.... damn you husband o' mine!!! I warned you about opening this forbidden door!
August 19, 2010
My little shoes

Here are my little booties that I knitted for my friends. This one is a pink/black one. I have also modified my pattern to look like a Mary Jane shoe. Stay tuned, I will post pics of that one soon...
July 7, 2010
Life After Baby 2
So now I am in "post-pregnancy" status since I gave birth to my second little cutie 2 months ago. Like all moms I am sure, I am so thankful and blessed that the pregnancy went well and that I have a healthy bouncy baby to enjoy (again!). Then why am I so down and frustrated at this moment in time? Well, with my first I gained 56 pounds and told myself that it was just water weight. Of course, most of it wasn't and so I spent a good 4 months working my ass off to get back down to my pre-baby weight. It worked, I cardio'd my butt off and went on a nearly impossible low-calorie restricted diet (about 400 calories per day) and I drove myself (and my husband) crazy!
After I lost all the weight, I was so happy. But after a few months of going back to my regular diet and routine, I gained about 15 pounds back. I told myself "Hey, I know I want a second baby, so I'm just not even going to try to get into shape." Now, I really have no excuse do I?
Well, now I realize that what I really need is a lifestyle change. I admit I love love love to eat, and my weakness is dessert. But what I know now is that if I restrict everything I will always be one cookie away from feeling like a disappointment and a failure. So I'm still going to work my butt off, but I know it will be with a different state of mind. I'll let you know if I succeed or have fallen apart....
May 24, 2010
Emalyn Easy T Baby Booties Knitting Pattern - Can be worn 2 ways!


Get easy T baby booties pattern
March 19, 2010
My Model

Okay, I know that every mother in the world thinks their babies are just the cutest things in the world (remember that episode of the Flintstones where Fred calls all his buddies over to his house and tells them he's got a movie of the most beautiful girl in the world and sometimes she's in a bathing suit or her undies... then they realize it's hours of homemade videos of Pebbles?)
Anyways, here is a collage of my Pebbles modelling her cupcake hat. Enjoy!
The Cupcake Hat - Chocolate cupcake with white frosting


The Cupcake Hat - Chocolate cupcake with Pink Frosting


 Ahhhhhh, who doesn't love cupcakes! I have noticed the surge of cupcakeries around my city and couldn't resist thinking about how many other ways I could apply the cupcake theme. There are many patterns out there for a cupcake hat, and I'm sure all of them are just deliciously gorgeous! This is my little pattern that I invented, it's easy and scrumptous. The pink topper was made a bit bigger to fit my daughter's 2-year old head.
 Bright Beret


This wonderful bright beret pattern by Amanda Keeys was really easy to knit up in no time. As you can see, my little model just loves the color purple!
March 6, 2010
Baby/Toddler Jumper Dress - Quick and Easy

Feather and Fan Hat - Free Knitting Pattern


Here is the free pattern from Bernat:
http://www.bernat.com/pattern.php?PID=4743
The Baby Sophisticate - Take 2

This is the Baby Sophisticate Pattern knitted in the bigger size. In a rose pink color and with some flowery metal buttons, who says it's a pattern just for boys?
The Baby Sophisticate Pattern with matching hat

I found The Baby Sophisticate Cardigan pattern by Linden Heflin and I thought, "This can't possibly be as easy as it says." Sure enough, it was quick to knit and really a stylish pattern to make for a little one. Probably one of my favourite patterns so far, I also knit a little hat to go with it.
The Baby Sophisticate Pattern I noticed had some errors (eg. suppose to be 25 sts per sleeve, but it says 23). And it says K when you are suppose to P. But other than that, it is such a beautiful pattern that I am glad is shared with the world. Thank you Linden Heflin!
February 18, 2010
Double Breasted Peacoat for Toddler


I saw this fabric on sale for $2.99/m and couldn't resist making something....anything...out of it. it's too bad I didn't buy more to make myself something, but never the less I made this peacoat for my daughter and it's just so charming!
Baby Three Point Jester Hat With Purple Pom Poms - Free Knitting Pattern


I just love this whimsical little jester hat with pom poms! However, it does involve that crazy kitchener stitch and you would think that being married to my hubby who is from Kitchener would help.... it doesn't! Words of advice, just chant to yourself while you are doing it (Knit, Purl, Purl, Knit).....
Here is my pattern for you all:
Finished size: Fits approx. 6-12 months old with a head circumference between 14-18 inches.
Materials:
- Yarn, medium worsted weight #4
- Circular needle in 6.0mm (US 10), 16 inches (40 cm) in length.
- Double point needles (DPNs) in 6.0mm (US10) size.
- A pom pom maker.
- Place marker.
- Wool or yarn needle
1) Cast on 48 Sts.
2) *K2, P2, repeat from * to end. Repeat this until piece measures 1.5 inches.
3) K all sts for 3 rounds.
4) *K2tog, yo, repeat from * to end, ending with a yo.
5) K all sts for 5 rounds.
6) *K2tog, yo, repeat from * to end, ending with a yo.
7) Knit in Stockinette St until entire piece measures 6.5 inches from starting edge to your needle.
8) Transfer 8 stitches onto a dpn, then transfer the next 8 stitches onto a second dpn. Leave the rest of the sts on the circular needle.
9) Start your kitchener stitch by:
a. Take a long piece of yarn and thread it through the yarn needle.
b. Hold both dpn together in one hand with the WS facing each other (RS facing outwards).
c. Thread yarn Purlwise through 1st front loop.
d. Thread yarn Knitwise through 1st back loop. (careful to keep the yarn below the needle).
e. *Thread yarn Knitwise through the1st front loop and drop this st off the dpn.
f. Thread yarn Purlwise through the next (2nd) front loop.
g. Thread yarn Purlwise through 1st back loop and drop this st off the dpn.
h. Thread yarn Knitwise through next (2nd) back loop.
i. Repeat this from * until you have dropped all the stitches off both dpns.
10) Repeat Steps 8 and 9 twice so that you have 3 bound stitches, making the 3 points of the hat.
11) Weave all ends in.
12) Make 3 pom poms and attach to points. Voila!
Baby Bolero - From Debbie Bliss Pattern


Ahhhh, this little baby bolero is a cute, simple, little thing. I guess that's why everyone has knit one of their own from a free Debbie Bliss pattern available online! Except that the pattern itself is kind of confusing and I got bored after awhile doing the stockinette stitch. Anyways, you can find the free pattern online at:
http://www.http//www.allaboutyou.com/craft/baby-free-knitting-patterns/special
Bubble Gum Pink Cardigan


Oh, I forgot to sew on the buttons, should be 3 buttons.
February 9, 2010
Beautiful Baby Cardigan - Free Knitting Pattern


http://www.knitwits-heaven.com/pretty_baby_sweater.htm
Here is the pattern:
Materials: One 4-oz. skein of knitting worsted weight yarn
Needles Size: 6mm (10 us)
Crochet Hook Size: 6mm
3 small buttons
Gauge: 4 sts to 1 in”
Garment measures approx 20 in” around under arms.
Notes
Ml: Make a backward loop and place on right hand needle. (just twist yarn and place a loop over your needle to increase 1st)
(To see a great video for this backward loop method CLICK HERE)
Inc. 1: Knit into front and back of the next stitch.
DIRECTIONS:
Starting at the neck edge, cast on 33 stitches, using “knitted on cast-on”
Yoke
Rows 1 & 2: (k1, p1) to last st, k1.
Row 3: (k1, p1) to last 3sts, k1, yo, k2tog. (button hole row)
Row 4: (k1, p1) to last st, k1.
Row 5: k1, p1, k1, p to last 3 sts, k1, p1, k1.
Row 6: k1, p1, k1, * inc 1, k1, repeat from * to last 4 sts, end with inc. 1, k1, p1, k1. (47 sts)
Row 7: k1, p1, k1, p to last 3 sts, k1, p1, k1.
Row 8: k1, p1, k2, (yo, k2tog) to last 3 sts, k1, p1, k1.
Row 9: k1, p1, k1, p to last 3sts, k1, p1, k1.
Row 10: k1, p1, k1, *inc.1, k2, repeat from *, ending inc. 1, k2, p1, k1. (61 sts)
Row 11: k1, p1, k1, p to last 3 sts, k1, yo, k2tog. (button hole row).
Row 12: k1, p1, k2, (yo, k2tog) to last 3 sts, k1, p1, k1.
Row 13: k1, p1, k1, p to last 3sts, k1, p1, k1.
Row 14 : k1, p1, k2 *inc. 1, k3, repeat from * to last 5 sts, ending with inc. 1, k2, p1, k1. (75 sts.)
Row 15: k1, p1, k1, p to last 3 sts, k1, p1, k1.
Row 16: k1, p1, k2, (yo, k2tog) to last 3 sts, k1, p1, k1.
Row 17: k1, p1, k1, p to last 3sts, k1, p1, k1.
Row 18: k1, p1, k2, *inc. 1, k4, repeat from * to last 6 sts, ending increase 1, k3, p1, k1. (89sts)
Row 19: k1, p1, k1, p to last 3 sts, k1, yo, k2tog. (button hole row).
Row 20: k1, p1, k2, (yo, k2tog) to last 3 sts, k1, p1, k1.
Row 21: k1, p1, k1, p to last 3sts, k1, p1, k1.
Row 22: k1, p1, k3, *inc. 1, k5, repeat from * to last 6 sts, inc. 1, k3, p1, k1. (103 sts.)
Row 23: k1, p1, k1, p to last 3 sts, k1, p1, k1.
Row 24: k1, p1, k2, (yo, k2tog) to last 3 sts, k1, p1, k1.
Row 25: k1, p1, k1, p to last 3sts, k1, p1, k1.
Row 26: You will now be placing markers (pm) to show positions of fronts, back, and sleeves:
k1, p1, k4, m1, k5, m1, k5, m1, k1, pm (20sts for front),
k1, m1, k6, m1, k5, m1, k6, m1, k1, pm (23sts for sleeve),
k1, m1, (k6, m1) twice, k5, m1, (k6, m1) twice, k1, pm (37sts for back),
k1, m1, k6, m1, k5, m1, k6, m1, k1, pm (23sts for other sleeve),
k1, m1, k5, m1, k5, m1, k4, p1, k1. (20sts for other front).
Row 27: k1, p1, k1, p to last 3 sts, k1, p1, k1.
Row 28: Beginning and ending row with k1, p1, k1…Knit across row, increasing 1st before and after each marker. (131 sts)
Row 29: Same as row 27.
Row 30: Same as row 28. (139 sts).
Row 31: k1, p1, k1, p to last 3 sts, k1, p1, k1.
Next row: k1, p1, k1, k19sts and place on a stitch holder. Cast on 2sts, knit across the next 29sts (first sleeve), Cast on 2sts, Working with another set of needles and on these 31sts, work in stockinette stitch for 23 rows.
Sleeve Decrease Row: k2, (k2 tog, k3) 5 times, k2tog k2. (25sts left)
Next Row: Purl
Next Row: k1, (yo, k2tog) repeat to end or row.
Next Row: Purl.
Work 4 rows k1, p1 moss.
Cast off 24sts, placing last stitch onto a 6mm crochet hook. With right sides together slip stitch sleeve closed being careful to close up all the holes at the underarm. Place last stitch on left hand needle. Knit 2 tog and knit across to next marker. Place back of sweater stitches that you just knit on a stitch holder.
Work second sleeve same as first. Knit across remaining stitches to last 2sts, p1, k1.
Sweater Body: Placing all stitches back onto working needles.
Row 1: k1, p1, k1, purl to last 3sts, k1, p1, k1.
Row 2: k1, p1, k to the last 2sts, p1, k1.
Rows 3-15: repeat Rows 1 and 2.
Row 16: k1, p1, k2, (yo, k2tog) to last 3sts, k1, p1, k1
Row 17: k1, p1, k1, p to last 3sts, k1, p1, k1.
Row 18: k1, p1, k1, knit to last 2sts, p1, k1.
Row 19: k1, p1, k1, purl to last 3 sts, k1, p1, k1.
Row 20: k1, p1, k2, (yo, k2tog) to last 3sts, k1, p1, k1
Rows 21-24: (k1, p1) to last sts, k1.
Cast off.
Subscribe to:
Posts (Atom)

