May 26, 2019

Soap Making Melt and Pour Swirl Design - Fresh Linen

Another beautiful set of lovely smelling soap made from melt and pour (MP) double butter and glycerin soap.  I decided to make this loaf of soap with fresh linen fragrance since after you use it you smell like fresh laundry (a great scent for men who just want to feel clean with no floral or musky notes).

For this swirl design I used:

1) MP double butter soap in white and brown.
2) MP glycerin soap in green and blue-green.
3) silicone mold with dividers that split the mold into 3 cavities length wise.


I poured the green and blue-green glycerin on each side and the white double butter in the middle.  The temperature was roughly 140 degrees Fahrenheit before I removed the dividers (note to thy self: wait until it cools to 120-125 degrees F if you want more of a chunky swirl effect).  I then poured the brown over the entire loaf and took a stick and swirled the loaf in a zig zag width wise.

You can see the wonderful color variations of white mixing with the brown and hints of blue-green transitioning to green.  So satisfying!


May 10, 2019

Melt and Pour Soap Swirling Technique - Pineapple Mango

I tried this next swirl technique by using 2 different colored glycerin soaps (yellow and green) and 3 different double butter soaps (orange, yellow, and white).

Dividing my loaf mold lengthwise to make 2 cavities:

1) Pour yellow glycerin on left side, and orange butter on right side.
2) Next pour green glycerin on left side, and yellow butter on right side.
3) Remove divider and randomly pour white butter on top.
4) Taking a chop stick, I pulled it through the entire loaf in a zig zag pattern width wise from one side to the other side.

Tada, what a great result I got!  The swirls turned out wonderfully, and the pineapple mango is the yummiest scent! 


Swirl Melt and Pour Soap - Freesia

My next batch of Double Butter Soap (Freesia), using 3 divided layers in Lilac Double Butter, White Double Butter, and Peach Glycerin.

The one thing I learned about this swirl technique is that the moment I released the dividers the Glycerin in the middle naturally sank into the bottom!  It's still a pretty effect and the actually allows you to cut the loaf lengthwise too.


May 5, 2019

How to Swirl Melt and Pour Soap Making Hot Process - Rain Forest

Hello Soap Makers!

Melt and Pour Soap Making (aka MP or "Hot Processing") is simple, addictive, and instantly gratifying.  Unlike "Cold Processing" that involves lye water and fats that can be caustic and dangerous, MP can be done without too much fuss.

But how can MP lovers get that wonderful swirl effect like cold process soaps?  The truth is that it can't replicated exactly, but I've found some successful techniques that I'll be trying out more and sharing with you all.


Please Note: I did not include the exact recipe measurement since I've been told everyone has their own preference of smells and colors.

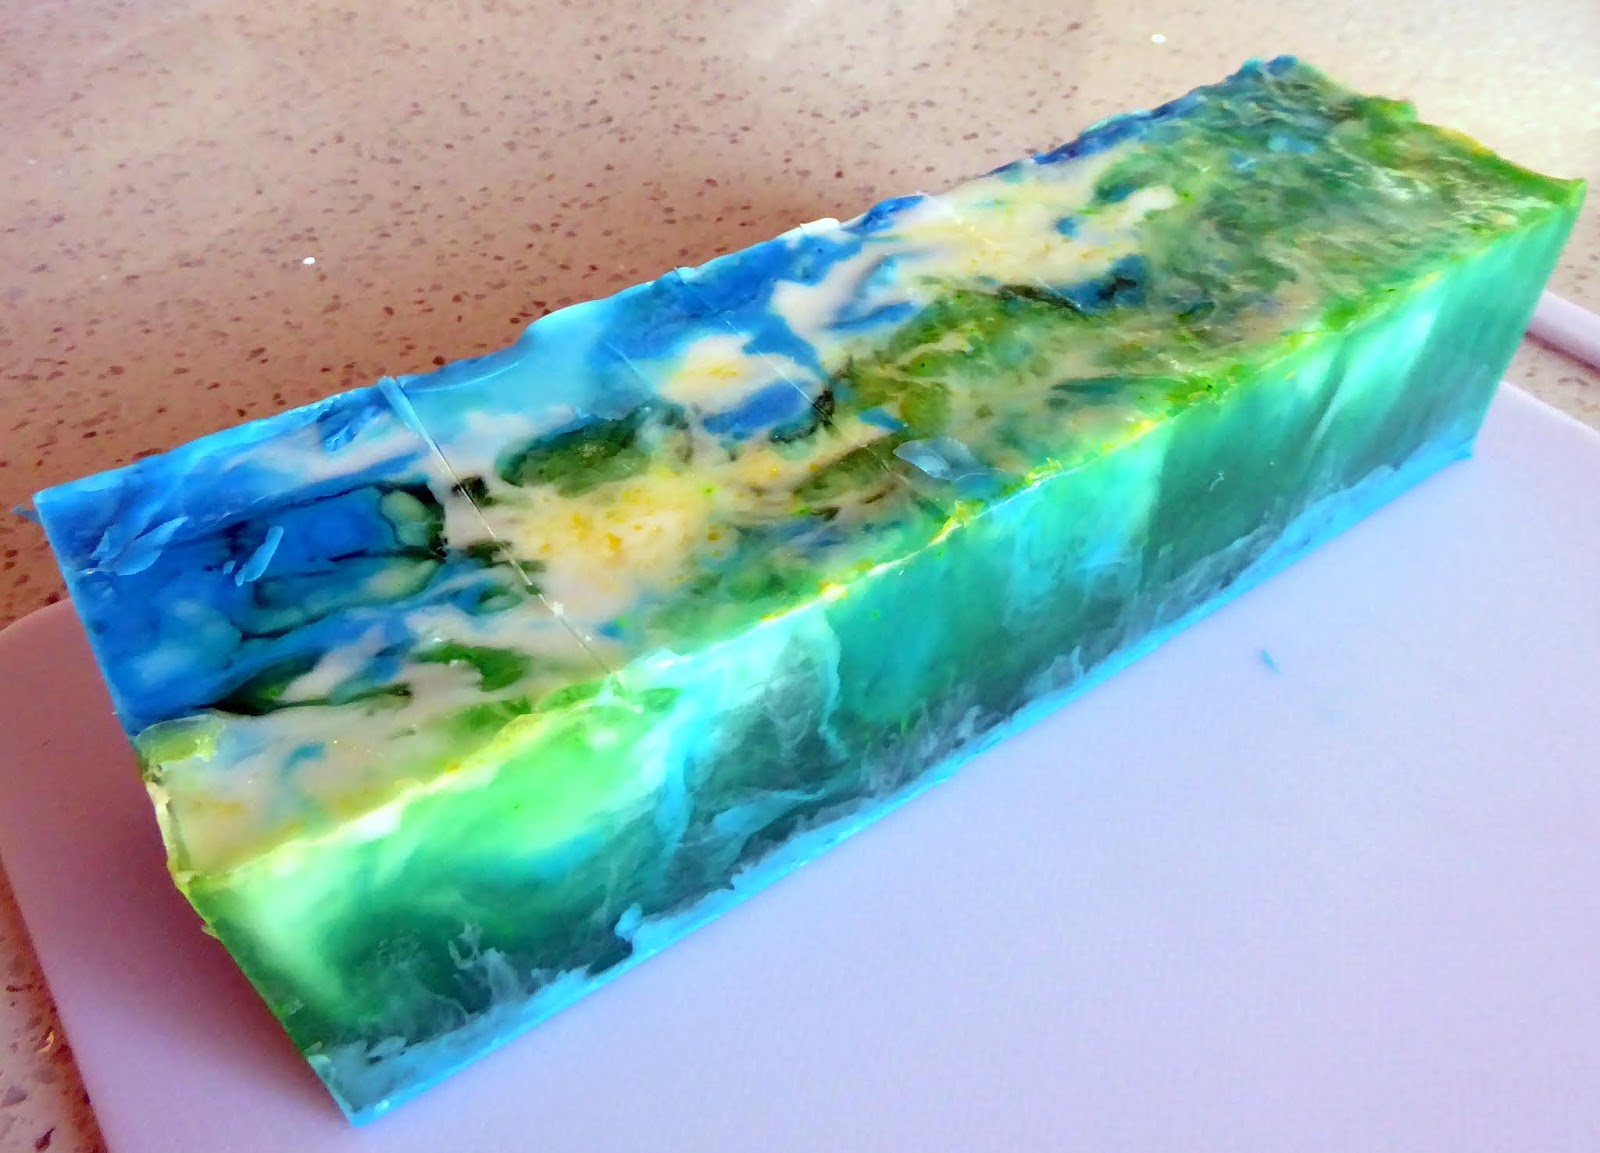
Attempt #1 - Using 3 different MP soap batters into 1 loaf mold divided into 2 length-wise

- Goat's Milk MP soap base (1.5 lbs) - Color = Brilliant Blue, Fragrance = Rain Forest
- Goat's Milk MP soap base (0.5 lbs)  - Color = White, Fragrance = Rain Forest
- Glycerin MP soap base (1.5 lbs) - Color = Aqua+Neon Green, Fragrance = Orange+Eucalyptus

1) I used a plexiglass loaf mold (4 lbs) and bought some plexiglass dividers that are sold separately.
2) I taped the dividers together scotch tape to be the same length as the loaf mold, and inserted it into the centre so that the mold was partitioned (or divided) lengthwise into 2 cavities.
3) I then poured the Goat's Milk in Brilliant Blue on one-side, then poured the Glycerin in Aqua Neon Green on the other side.  IMPORTANT: Make sure the temperature of all batters are approx. 110-125 degrees F.
4) After this, I waited for about 2 minutes and then poured the Goat's milk in White on top.  IMPORTANT: There is a technique in the higher you pour the deeper the batter will land into the mold.  If you just want a surface layer, carefully pour the batter gently close to the surface.
5) Let sit for 24 hours, then remove from mold and cut into bars.  Let bars sit for another 24-48 hours to allow for hardening and drying before use.


So, this is my first attempt and swirling MP soap!  Overall, I'm pretty happy with the effect and would do it again.  Hope this inspires you all to try swirling melt and pour soap!


May 14, 2017

Knitted Cotton Dishcloth Leaf

Knitted Cotton Dishcloth Leaf


Knitted Scallop Scarf

Knitted Scallop Scarf


Knitted Skinny Cable Scarf

Knitted Skinny Cable Scarf.


Knitted Scarf Branches Pattern in Dragonfly

I saw the yarn, bought it, chose a pattern, made a scarf.  Here it is!

Ahh, vacation projects are just that simple aren't they...


Super Easy One Row Lace Scarf Knit

I found this one row lace pattern somewhere on the internet and was so happy with the results!

Don't you just love the yarn?


Knitted Capelet Little Shell Pattern

This knit really does look stunning when worn over anything! If you haven't tried a little shell stitch pattern, its a very simple and effective pattern to use. Typically, the stitch pattern accounts for RS and WS, but I knitted this in the round so all the WS are actually RS! (Does this make sense?) Anyways, the modified stitch pattern to be knitted in the round is below.
Little Shell Capelet Pattern Instructions 
(1 size typically will fit all)
You will need:
- size 6mm circular needles
- Stitch marker
- 300g of bulky #5 yarn.

Little Shell Stitch Pattern - Modified for Round Knitting
Cast on multiples of 7 + 2 stitches (I used 121 sts total for my project)
Round 1 and 2: Knit all sts.
Round 3: K2, *yo, p1, p3tog, p1, yo, k2; rep from * to end
Round 4: Knit all sts.

Pattern Instructions:
1) Cast on 121 sts and knit the little shell stitch pattern until piece measures approx. 11 inches in length.
2) Next round: *K2tog, repeat * to last st, knit 1 st. (61 sts total)
3) Knit 5 rounds of Ribbed collar row: *K1,P1, repeat *to last st, knit 1 st.
4) break yarn and weave in tail end.


Knitted Elegant Lace Capelet (Cape)

This elegant capelet was knit with burgundy yarn using a chevron knit pattern in the round.  So impressive when you put it on!  I had to knit another capelet right away...


February 28, 2017

Chevron Pattern Scarf - Exploring Knitting Lace Patterns

Well, sometimes you just need to add some zing to knitting with adding lace, texture, or cables.  Here is a chevron pattern done 3 times along a scarf.  The scarf begins and ends with a 1x1 rib.

By the way, I am so in love with this Bernat Softee Chunky Yarn!  The dark green is so saturating and eye catching.

Long live scarf projects...


October 12, 2016

Easy Apple Pie Recipe Homemade TESTED and TRUE

I haven't been exploring pies for a long time (years even!) due to many depressing failed attempts.  However, I finally have a proven recipe that is relatively easy to make and will impress at any potluck or dinner event.  So search no more pie-making yearners, this is legitimately tried, tested, and true.  Here we go!


The Createry Shop's Easy Apple Pie Recipe - TESTED and TRUE
(makes one 9" pie)

Ingredients - Double Pie Crust
- 2 cups all purpose flour
- A pinch of salt
- 1 stick of vegetable shortening, cold
- 2 to 4 tbsp of cold water
- 1 egg beaten to be used as egg wash

Ingredients - Pie Filling
- 4 medium apples - cored, peeled, and sliced evenly (this is probably the most time consuming task in my opinion!)
- 1/2 cup of brown sugar (3/4 of brown sugar if apples are more tart than sweet)
- 1 tbsp of cinnamon

Directions to make double pie crust shell
1) Mix flour and salt in a bowl.
2) Add cubes of shortening to bowl and start mixing to create dough.  Add tbsp of cold water for consistency to make dough stick together and not become crumbly.
3) Roll out dough and lay on 9" pie shell.  Cut dough to fit shell.  Do this twice to get 2 crusts (1 for bottom, 1 for top).

Directions to make pie
4) Mix all of the pie filling ingredients together in a bowl.  Set aside and let sit for 30 minutes to let apple juices flow out of apple slices.  This helps in preventing your pie from becoming a pool of liquid mess!
5) Scoop filling into pie shell, making sure to drain as much juice out and lay the apple slices evenly throughout pie shell.  This helps the pie keep its structure when cutting into it.
6) Using a cookie cutter, cut a hole in the middle of the 2nd top pie crust shell for ventilation.  Place 2nd pie shell over pie as the top shell and seal edges together by pressing edges down with a fork.
7) Brush egg wash all over top shell.
8) Put pie on a baking sheet, back at 400 degrees F for 10 minutes, then at 375 degrees F for 30 minutes.
9) Remove pie from oven, let cool.  Impress people with your yummy homemade apple pie!

The End

February 26, 2016

Createry Shop Beanies

Oh so warm and colorful beanies.... except I grew up calling them toques.


February 15, 2016

READ BEAD BEANIES by The Createry Shop

 
Launching my latest collection of Read Bead Beanies!  Every beanie is 100% hand-made and unique.  Inspirational text beads to read make every beanie individually yours.

Re-invigorated by beautiful winter scenes and outdoor views of the world.
Every beanie has a bead with an inspired word.
Always comfy, always cozy.
Dyed yarn in striking, fun, and edgy colors that will stand out in the blinding snow.

Available now on The Createry Shop Etsy store at:
https://www.etsy.com/shop/createry?ref=hdr_shop_menu

Product Information:
- 100% hand-made, made in Canada.
- 100% acrylic yarn, so it won't shrink, fade, keep it's shape, minimize pill, and super durable.
- Machine washable and dryable.  Use normal to low heat.
- Do not bleach, do not iron, do not dry clean.
- Every item is uniquely made, slight variations on each product from catalogue photo is normal.

Shipping Information:
- Product is shipped from Vancouver and Greater Vancouver Area, Canada.
- We ship across North America!  Canada and United States of America.
- Shipping duration typically 2 weeks within North America.  The Createry Shop is not responsible for delays crossing borders, customs, or issues with incorrect addresses and courier errors.
- Please contact the Createry Shop directly if you require international shipping information.
 

The Createry Shop Copyright 2009 Sweet Cupcake Designed by Ipiet Templates Image by Tadpole's Notez